|
|
|||||||
|
|||||||
In order to follow the examples in this tutorial you will need to login using the panel to the left. If you don't have a Pandorabots account you can sign-up for an account here.
| Previous | Next | Contents | 1 | 2 | 3 | 4 | 5 | 6 | 7 | 8 | 9 | 10 | 11 | 12 | 13 | All | Printable View |
A Tutorial For Adding Knowledge to Your Robot
A Web of Knowledge
Some of you might find this metaphor helpful for visualizing how knowledge is laid out in your robot. Imagine a spider web - it has a center with spokes radiating outwards from the center. Your robot's knowledge is stored in a Knowledge Web, and like the spider, your robot darts out in response to some sort of tug it senses in the web. Understanding how to store knowledge is our first task. Because it is too hard to draw the whole web, in the examples that follow, only a portion of the web will be shown - so please use your imagination for the rest.
Starting at www.pandorabots.com, if you have not already done so, create an account and once logged in, create a robot by clicking on Create a Pandorabot (it's at the top of the screen). On the next screen, name your new robot, Full (for full of knowledge) and make sure the radio button labeled, "Dr Wallace's A.L.I.C.E - March 2002" is selected (see [1]). After clicking on Create Pandorabot to create your new robot the next screen will show:
"This pandorabot is not published. When you are ready, you can publish your pandorabot to make it available for others to chat with. You may first want to customize your pandorabot by changing some of its properties or by providing your own custom responses with the training interface."Click on the Train link on the second row of menu buttons to begin interactions with your robot. This robot already has a substantial knowledge base (taught by Dr. Richard Wallace) so let's start by posing the question:
Human: Do you love me?To ask this question, type in "Do you love me?" in the text field labeled Human: and then press Enter or click on the Ask button to the right of the text box.
Full: Yes I love everyone.
The robot knew in advance how to answer this question. How specifically did the robot discover the answer? First the robot checked if its knowledge already contained the question "Do you love me?" And second, finding it, checked to see if it had been taught to respond with something meaningful.
Categories
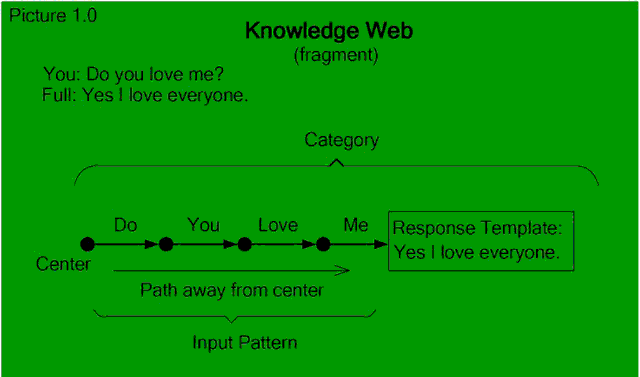
The words in the sentence "Do you love me?" can be visualized by a series of lines (or links) and nodes, in the knowledge web. This is illustrated below in Picture 1.0. The links are labeled by the words (you can think of the nodes as representing the spaces between the words) and form a chain starting from the center of the web and moving outwards.

Finding the question in the Knowledge Web, the robot replies with the information we taught it (residing in a Response Template - and referred to as the template). So, in other words, the specific question "Do you love me" can be visualized as a kind of path - beginning at the center of the Knowledge Web and built up by a series of links and nodes, and that finally terminates in a Response Template.
The specific path through the Knowledge Web along with the (Response) Template is called a category. If, for example, you teach the robot to respond with: "yes, but only when you are good" you only change the Response Template.
More about Categories
Let's start over with a robot that has no knowledge. Create a new robot exactly as before except that this time, name the robot Empty and select the radio button labeled, "No initial content, the pandorabot starts with no knowledge". Again, once the robot is created, click on Train to start interacting with it.
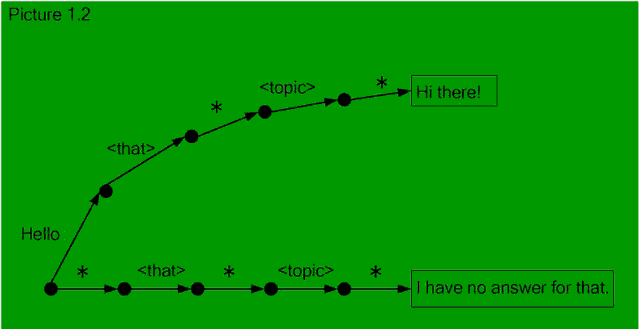
Initially, Picture 1.1 shows Empty's very simple Knowledge Web. One Category is shown and notice the Response Template contains the one sentence "I have no answer for that". You will also notice *, <that> and <topic> labeling the links between the nodes. The labels *, <that> and <topic> are special optional variants offering enhancements to Categories. As we shall see, these special labels extend the matching power of the Categories.

So what does this one Category do? To begin with the * label allows any interaction with Empty to return the same response:
Human: HelloMore generally, words or sentences provided to the robot are called the Input Pattern. You can visualize any sentence existing in the Knowledge Web as a path of linked nodes, terminating with a Response Template. The robot searches for a path of linked nodes that exactly matches the Input Pattern. When a path is found, we say that the path matches the Input Pattern.
Empty: I have no answer for that
Human: abc
Empty: I have no answer for that
Default Responses
It happens often that an Input Pattern will not be found in the Knowledge Web - yet we still want the robot to respond with something meaningful. We call this the Default Response Template - and it typically consists of sentences designed to keep the conversation going. We can visualize the Default Category (a path empty of all words and it's Response Template) by Picture 1.1(pictured above). The * will match any words. The <that> and <topic> will be explained later.
In order to teach your robot to say "Hi there!" in response to "Hello", do the following:
- Make sure you're on the robot's Training page (if not click on Train)
- Type in "Hello" in the box labeled Human:.
- Click on Ask (or press Enter)
- After the robot responds, type in "Hi there!" in the box labled Empty:
- Click on Say Instead (or press Enter)
- Verify your change by clicking on (the first) Ask Again button.

The robot has just two responses now - and is incapable of supporting its side of an interesting conversation. Let's make some more changes. In response to you typing anything but Hello (the one input pattern that Empty now knows about) Empty will randomly present you with three possible responses. Type:
Human: hiNext, click on Advanced Alter Response and in the box in the pattern column, replace HI with *, which means that anything you type in will be matched with a response. Now let's add three random possible responses. In the box labeled template add:
Empty: I have no answer for that
and click on the Submit button (at the bottom left of the page). For an explanation of the syntax used above see [2].<random> <li>What is your name?</li> <li>What is your favorite movie?</li> <li>Will you buy me a drink?</li> </random>
The Knowledge Web now looks like Picture 1.3.

We've changed the Default Category by changing the Default Response Template from "I have no answer to that" to one of three randomly chosen responses.
Like a hapless, but precocious child failing to understand what is being said, yet unwilling to be abandoned, Empty attempts to prolong the conversation by offering a choice of three "pick-up" lines hoping to change the subject. Empty proffers pick-up lines randomly hoping to disguise how little it actually knows. Check this yourself by typing anything but "Hello".
Click on the Ask This Again button enough times to cycle through all of the pick-up lines.
Saving your Work and Starting Over
For reasons you'll see later, most of the time you'll want to avoid changing the Ultimate Default Category. Let's go back to the beginning and start over, and simultaneously learn how to save files.
To view the AIML files for a particular robot, click on the AIML link (this is near the top of the screen, on the second row of links). If you don't see this link but instead see a table of all your robots, you'll first need to click on the name of the robot - Empty in this case.
Scroll down until you see a section like this:
Below the first heading, Filename you'll see a file named, update.aiml (every robot has their own unique version of this file) that contains any changes that you made to the robot's responses using the Training Interface.Click on, update.aiml and then scroll down to the text area. Here you may edit and save the robot's responses on-line. After you've edited the text, be sure to click on the, Save As button to make your changes permanent (see [3])
As an alternative to editing the AIML file on-line, you can use the Download link next to the filename to download a local copy which you can then edit with an XML editor on your own computer (possibly while not on-line). You can later use the form at the bottom of the AIML files page to upload the modified AIML back to Pandorabots. It's also not a bad idea to keep a local copy of your AIML in case you accidentally delete it on the server.
Let's look at the file for a minute (shown below with some minor reformatting). The first line (of header information) tell us the type of character set and versions of XML (see [4]) we are using. The next line tells us we are using AIML version 1.0.
<?xml version="1.0" encoding="UTF-8" ?>
<aiml version="1.0">
<category>
<pattern>HELLO</pattern>
<template>Hi there!</template>
</category>
<category>
<pattern>*</pattern>
<template>
<random>
  <li>What is your name?</li>
  <li>What is your favorite movie?</li>
  <li>Will you buy me a drink?</li>
</random>
</template>
</category>
</aiml>
Categories are specified by the information between the beginning and ending
lines in the form:
<category> ...information... </category>Similarly, the input words are specified by:
<pattern> ...information... </pattern>The output response is specified by the information between <template> and </template>.
The items between "<" and ">" are called AIML tags or elements. Each AIML tag has an opening tag and a closing tag of the form:
<some-tag> ...information... </some-tag>It sometimes happens that there is no information between the opening and closing tags and you can use the abbreviation:
<some-tag/>(note the "/" after the tag name) as a replacement for:
<some-tag></some-tag>Each time you click on the Submit button on the Advanced Alter Response page (or click on Say Instead) the effect is to add new information to the file, update.aiml. A good way to learn AIML syntax is to examine the modified update.aiml file as shown above.
Another random Category
Next we're going to create a new version of Empty and again create a category using <random>. However, this time we won't define it as the default category. This example is used as the basis for the fourth example in the next section.
Creating a New Version of Empty
First click on My Pandorabots and then in the table of robots, click the radio button next to the name, Empty. From the drop-down menu below (it's initially labeled, Publish) select Delete. Next click on the, OK button on the right and confirm that you want to delete the robot, Empty.
Then, simply repeat the procedure you followed for creating the first robot, Empty and you'll have a fresh empty robot.
Being empty of knowledge the only thing Empty can say is:
Empty: I have no answer for thatLet's increase the possibilities for an interesting conversation by giving four possible random responses to the next inquiry.
Human: You do love me don't youAfter typing the above into the Training interface, click on Advanced Alter Response and in the box labeled template add:
Empty: I have no answer for that
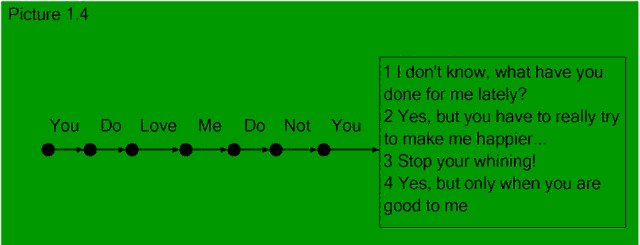
...and as before click on the Submit button. Next, click on the Ask Again button enough times to cycle through the complete set of responses. The Knowledge Web now looks like Picture 1.4.<random> <li>I don't know, what have you done for me lately?</li> <li>Yes, but you have to really try to make me happier...</li> <li>Stop your whining!</li> <li>Yes, but only when you are good to me </li> </random>

Contractions like "don't" are expanded to "do not", so: "you do love me don't you?" is transformed to the rather awkward, "you do love me do not you" (see [5]).
Copyright © 2002 - 2004 Doubly Aimless
| Previous | Next | Contents | 1 | 2 | 3 | 4 | 5 | 6 | 7 | 8 | 9 | 10 | 11 | 12 | 13 | All | Printable View |
